Manage agent schedules
Supervisors, schedulers, and administrators can do many different tasks on the Agent Schedules page:
- View agent schedules
- Sort and filter agent schedules
- Edit agent schedules:
- View agent adherence and conformance
- Check projected coverage
Prerequisites
You are a supervisor, scheduler, or administrator with agents assigned to your WFM view. A schedule has been run for the agents you are viewing. To edit schedules, you need the Edit Schedules permission.
Page location
Schedules and Planning > Agent Schedules
Procedures
- Select the agents’ service queue group, service queue, skill mapping, or team from the Search Criteria drop-down list. Today’s schedule for the group displays with agents ordered by start time. Activities are color coded.
-
Hover over an activity for more information.
NOTE Sometimes, the activity information window appears to show an incorrect start or end time for the activity. This can happen because activities are in two layers. The bottom layer in the schedule is for in service, overtime, assignment, and closed service activities. The upper layer is for breaks, lunches, projects, and exceptions. If you hover over a bottom-layer activity, the information window shows the full length of time for that activity without considering any upper-layer activities that might be on top of it.
The Work Shift field does not appear in the activity information window if the agent was scheduled using dynamic availability.
Sort and filter agent schedules
You can apply several filters to agent schedules so that you see only the information that is relevant to you.
- To sort the schedule by agent name, rank, or start date, click the Agents drop-down list at the top left of the screen.
- To see a schedule for a specific agent, enter the agent’s name in the Filter Agents field at the top of the page.
- To see a schedule for a different date, click the month, year, and/or day at the top of the page.
- To see a broader view of the schedule, click Week or Day in the top right corner.
- To see what schedules look like for agents in different times zones, select a time zone from the Time Zone drop-down list.
- To pin an agent to the top of the list, hover over the agent’s name and click the arrow icon. To unpin an agent, click the arrow icon again.
- To create a customized list of service queues, service queue groups, teams, and/or skill mappings, select Select from the bottom of the Search Criteria drop-down list (under Custom).
- Select Insert Activity from the Actions drop-down list. The Insert Activity dialog box opens.
- Click Agent Selection (the person icon). A list of available agents displays.
- Select the agents from the list. Agent names display in the Agents box. (To remove an agent, click their name in the Agents box and click Remove.)
- Click Close.
- Enter the activity’s start time and end time, or select Start Time with Duration to enter a duration instead of an end time.
- Select the activity type from the Activity drop-down list. If more drop-down lists appear, narrow down the activity type as needed.
- If the activity is paid, select the Paid check box. If the activity is unpaid, clear this box. This box is automatically selected or cleared depending on the type of activity you select.
- Click Insert. The Insert Activity window closes, and the activity appears on the agents’ schedules.
- Click Save (top right of the page). The Save Schedule Changes dialog box opens.
- Click Save. The Save Schedule Changes dialog box closes.
Find the best time to schedule an activity
Follow these steps to schedule an activity so that it has the least impact on the service level.
- Select Find Optimal Time from the Actions drop-down list. The Find Optimal Time dialog box opens.
- Select the first day that the activity could happen from the Start Date calendar. You can select a date within the current week.
- Select the last day that the activity could happen from the End Date calendar. You can select a date within the current week.
- Enter the earliest time that the activity could start in the Start Time field.
- Enter the latest time that the activity could start in the End Time field.
- Enter how long the activity will take in the Duration fields.
- Enter the number of agents who will do the activity in the “No. of Agents” field.
-
Click Analyze. Possible times display in the Analysis Results section.
NOTE The Gap column shows the difference between the number of forecasted agents and the number of agents actually scheduled. A positive number indicates overstaffing. A negative number indicates understaffing.
- When you have chosen a time, click the number in the In Service Agents or Scheduled Agents column. The Insert Activity dialog box opens.
- Move the agents who will perform the activity from the Available column to the Assigned column.
- Select the activity from the Select Activity drop-down list. If more drop-down lists appear, narrow down the activity type as needed.
- If the activity is paid, select the Paid check box. If the activity is unpaid, clear this box. This box is automatically selected or cleared depending on the type of activity you select.
- Click Insert. The Insert Activity dialog box closes.
- Click Save (top right of the page). The Save Schedule Changes dialog box opens.
- Click Save. The Save Schedule Changes dialog box closes.
- Double-click the agent’s schedule. The schedule divides into two rows, with breaks, lunch, and special projects above in-service time.
- Drag an activity to a different time. The Start Time and End Time change. If you have the Coverage drawer open, the predicted coverage adjusts when you release the activity.
- Double-click the lower (solid) row to collapse the agent schedule back into one row.
- Click Save (top right of the page). The Save Schedule Changes dialog box opens.
- Click Save. The Save Schedule Changes dialog box closes.
To delete an activity from an agent’s schedule, insert another activity over the top of it.
- Right-click the activity, and select Insert from the drop-down list. The Insert Activity dialog box opens with the activity start time and end time filled in.
-
Select a new activity from the Activity drop-down list. If more drop-down lists appear, narrow down the activity type as needed.
NOTE To put the agent back on the service queue, select In Service. Select the service queue from the Search Criteria drop-down list.
- Click Insert. A warning message appears.
- Click Override Conflict. The warning message closes, and the activity is removed from the agent’s schedule.
- Click Save (top right of the page). The Save Schedule Changes dialog box opens.
- Click Save. The Save Schedule Changes dialog box closes.
Optimizing breaks and lunches helps you maximize coverage without running a new schedule.
IMPORTANT You can optimize breaks and lunches that start at least one hour in the future. To move an activity that begins sooner than that, go to Move an activity.
- Select Optimize Schedules from the Action drop-down list (top right of the page). The Optimize Schedules dialog box opens.
- Select the Start Date and End Date to optimize. Today’s date is the default.
-
(Optional) To exclude some agents from the optimization, move them from Assigned to Available.
NOTE After you run the optimizer, you cannot pick specific changes to keep or discard. If you need to keep some agents’ schedules unchanged, exclude them now.
- (Optional) To exclude breaks or lunches from the optimization, clear the Breaks or Lunches check box. Otherwise, leave these boxes checked.
- Click Optimize. The Agent Schedules dialog box tells you how many agents’ schedules have been changed.
-
Click Close. The Agent Schedules dialog box closes. Schedules that have changed are divided into two rows.

- Click Save (top right of the page). The Save Schedule Changes dialog box opens.
- Click Save. The Save Schedule Changes dialog box closes, and the changes are applied to agents’ schedules.

Trade schedules between two agents
You can trade two agents’ schedules for the same day, different days, or multiple days.
IMPORTANT To trade schedules, both agents must be included in a schedule that was run for the time frame of the trade.
NOTE When a schedule crosses midnight, the agent is scheduled to start work on the day the schedule begins.
- Select Trade Schedule from the Actions drop-down list. The Trade Schedule dialog box opens.
- Select the time frame radio button in the Trade Type section. If you select Different Day or Multiple Days, From Date and To Date fields display in the Dates section.
-
Select the agents whose schedules you are trading from the From Agent and To Agent lists.
NOTE Only agents who are assigned to the team in your Main View appear in these lists.
- Select the date(s) for the trade from the Dates section. The agents’ schedules display, allowing you to compare them to see if the trade is feasible.
- Click Apply. The Apply Trade dialog box opens.
- Click Yes. The Apply Trade and Trade Schedule dialog boxes close.
- Right-click the agent’s schedule, and select Schedule History from the drop-down list. The Schedule History and Restore page displays.
- In the Results section, click any number in the Revision Detail ID column. The different versions of the agent’s schedule display.
- Click Restore next to the schedule that you want to give back to the agent. The Confirm dialog box displays.
- Click Yes. A confirmation message displays, and the change displays in the list of schedule revisions on the Schedule History and Restore page.
NOTE If you restore a schedule that includes a trade, only the agent whose schedule you restored gets a schedule change. The other agent who traded shifts does not get a schedule change until you restore their schedule manually.
Remove an agent from a schedule
To remove an agent from a schedule, add an unpaid activity over their entire work shift (similar to how you Delete an activity).
- (Optional) To remove the agent from a date other than today, click the date.
- Right-click the agent’s In Service time, and select Insert from the drop-down list. The Insert Activity dialog box opens.
- (Optional) If the Start Time and End Time do not cover the agent’s entire work shift, select the correct times.
-
Select an activity from the Activity drop-down list that would remove the agent from the queue. If more drop-down lists appear, narrow down the activity type as needed.
NOTE The activity you should select varies based on how your company has set up Calabrio ONE. Common activities to remove an agent are Exception and Not Available.
- If necessary, clear the Paid check box.
- Click Insert. A warning message displays.
- Click Override Conflict. The change appears on the agent’s schedule.
- Click Save (top right of the page). The Save Schedule Changes dialog box opens.
- Click Save. If the change violates any scheduling rules for the agent, a warning message displays. Otherwise, the Save Schedule Changes dialog box closes.
- (Optional) Click Ignore and Save. The warning message closes.
View agent adherence and conformance
-
Click the Adherence drawer (the small red triangle) to the right of the agents’ names.
The drawer opens to display agents’ real-time adherence. A green circle means the agent is currently adhering to their schedule. A red circle means they are not in adherence. This drawer also shows agents’ scheduled activity, current state, duration (how long they have been in their current state), reason code (RC), and adherence and conformance percentages for the day. This information updates automatically every 30 seconds.

-
Click an agent’s name to see more information about that agent. Click the agent’s name again to close the drawer.
NOTE The numbers in the agent drawer might be slightly different from the numbers in the overall Adherence drawer because these two drawers update at different rates and because numbers in the Adherence drawer are rounded.

-
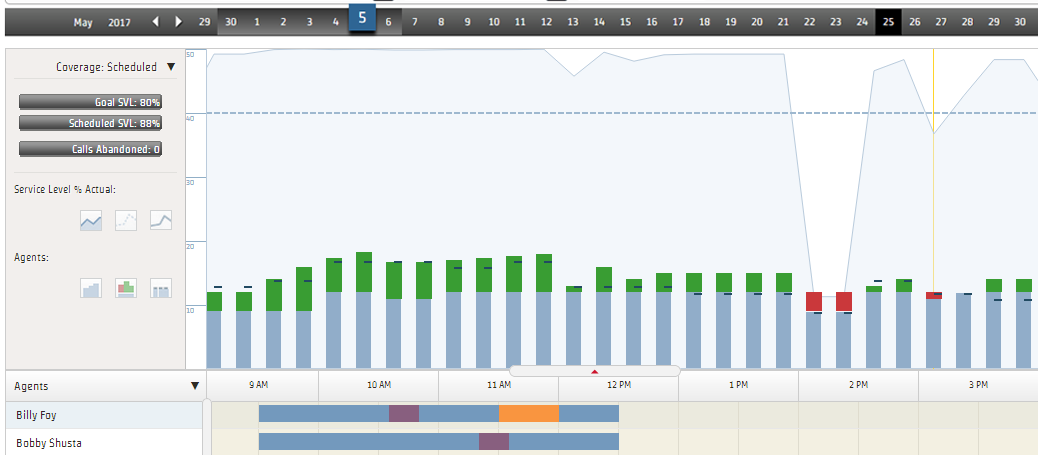
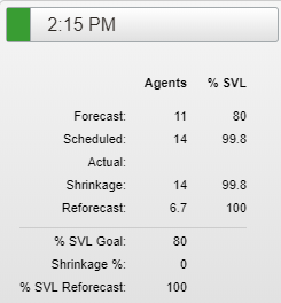
Click the Coverage drawer (small red triangle) at the top middle of the screen.
The Coverage drawer opens to show the projected coverage level for the day. Each vertical bar represents 15 minutes and compares your scheduled number of agents to the number you need for your expected contact volume.
A green top on the bar means you have more than enough agents scheduled. A red top means you don’t have enough agents scheduled. A plain blue bar means you have exactly the number of agents you should need. For time periods that have passed, a black dash represents the actual level of coverage.

-
Click a vertical bar for more information on that 15-minute period.


Related topics